Adventures in Snapter Testing
Awhile back I read about an interesting new piece of software on The Student Tablet PC blog. Snapter is intended to straighten out photos taken of papers, business cards, and books. Since I've photographed a lot of books for my research, I was excited, especially since it looked like it was possible to get very nice results.
First, let me clarify what I do, why, and how I do it.
Many books I need in my research are relatively hard to find; they also tend to be long and/or include images I want to study. In the US, I ordered some of these via Interlibrary Loan, and while ILL is a heavenly service, the laws of nature apparently dictate that anything ordered on ILL will arrive when one has the least possible time to peruse it. Consequently, I scanned a few of the shorter and less fragile titles, and used our departmental camera stand to photograph others. I also photographed some books from our own library, or that I had bought, so that I could have the material readily available on my laptop when I went to Prague.
In Prague, I photograph some books but particularly material from bound journals, most of which are from about 1920-1938. Some of these have very tight bindings, meaning the pages don't want to lie very flat, and some of them have fragile or damaged pages because they were printed on poor quality paper and have been heavily used over the years. I also photograph archival documents.
My next step, usually, is to create a PDF document of the book or journal. This is in order to have one file rather than hundreds, and so that (theoretically) I can set it up for highlighting and other markup. I use Acrobat 6, and the process is 1) Create PDF from multiple files; 2) do any rotations necessary; 3) if the text is fairly straight and in a western European language (i.e. not Czech or Polish), I run the Capture feature. Acrobat's Capture feature is a type of OCR and makes the document searchable and highlightable, but unfortunately version 6 doesn't have support for Czech documents, so I can't do this on most of my texts. Also, which is relevant to Snapter, the Capture feature fails on documents where the lines of text aren't straight enough. (Capture also requires a minimum 300 dpi image, more for small text.)
I perceived, then, a need for something that could correct problems relating to page curvature. After all, if something is merely crooked, I can rotate it in Photoshop, but I'm not aware of any curvature correction in Photoshop (I'm not an advanced user so it might be there, but probably not the kind I seek; correct me if I'm wrong).
Well, I'm sorry to say that my initial experiments with Snapter were disappointing. This shouldn't prevent anyone from trying it, as it's a new product, still being actively tested and improved (barely out of beta), a free trial, and other people's results may be very different than mine. So, go ahead and download it and test it yourself!
I thought, however, that I would show some screen shots of my testing results. They go from the abysmal to the usable.
Figure 1.
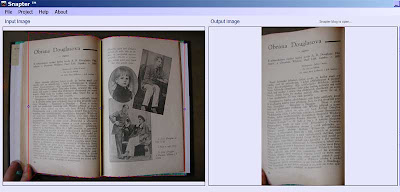
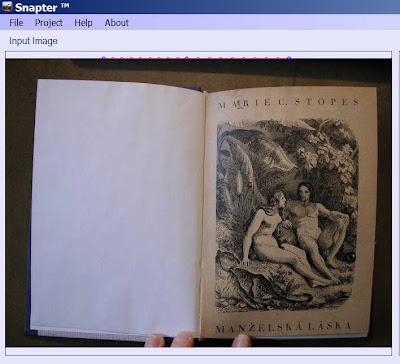 Using your fingers near the spine to hold the pages flat (something I frequently have to do) causes Snapter total meltdown. Click on photo to view exactly where the bounding lines go on this otherwise pretty straightforward photo. Yeah, they're all up above the book.
Figure 2.
 Here, the fingers are farther apart so Snapter at least recognizes that it has to do something. Putting lines around the book, however, are not yet on its agenda.
Figure 3.
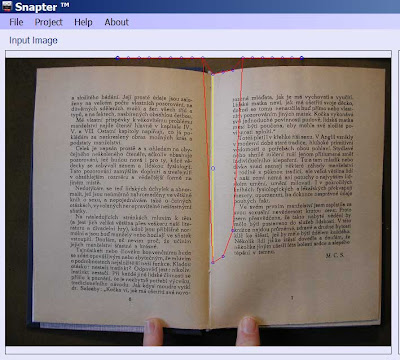
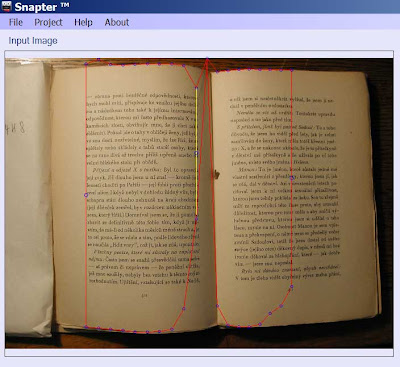
 One of my main gripes about the version I used (1.03.04) is that I didn't find it very adjustable. OK, so the program initially didn't quite recognize the page borders, but it should be possible to manually adjust. Note the placement and length of the yellow line. It's supposed to be the divider between the two pages. I found that it was somewhat possible to move it right or left if Snapter misplaced it, but for some reason it usually was very short and I couldn't get it to lengthen to the full height of the book. That then messed up the red lines that are supposed to delineate the edges of the pages. Note how on this pretty much nice-and-flat volume the red lines go all over. If this bound journal were any flatter, I wouldn't even bother to try correcting it. As far as I can tell, the problem here must be that the page goes to the edge of the photo at one point, as Snapter requires a dark background all around. Well, when I took the photos, I was trying to maximize page coverage, and avoiding having background. I had no idea I would later need a dark background for Snapter.
Figure 4.
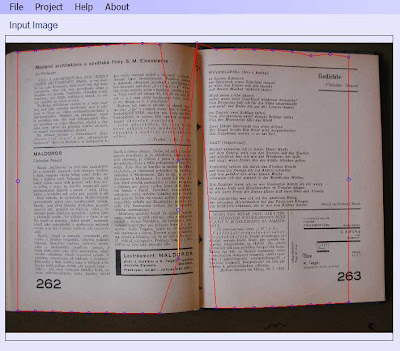
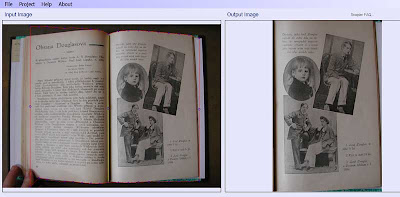
In this example, Snapter messes up the outline for the left page, which I think (I did these a couple of weeks ago) resulted in it working on only the right page. (Click on the image to see a larger version that shows how the red line cuts off the left-hand page near the gutter.) It is possible to move the red lines a small amount, but what I found curious is that while they have various nodes that ought to be adjustable, I was only able to move two of the nodes--those that represent the centers of the page edges farthest from the spine. Even those could only be moved a small amount. This meant I couldn't correct for most of the problems presented in Snapter's initial attempt.
Figure 5.
 In this instance, the paper I had used to hold the left page in place messes with Snapter's need for a dark background. However, I really don't understand why that affected the rest of the image. You'd expect it to mess only with that edge.
Figure 6.
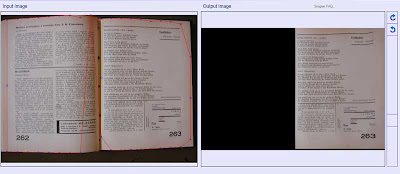
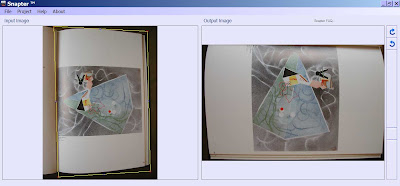 Some of my photos are single-page, so I did some tests using the Document setting rather than Book. Here, it cropped ok (but so would any image-editing program), but since I could only choose the corners for adjustment rather than additional nodes (still an improvement over the adjustability for the Book setting), the result didn't flatten much. In other words, I could have gotten the same result in quite a few other programs and not had it mysteriously rotate.
Figure 7.
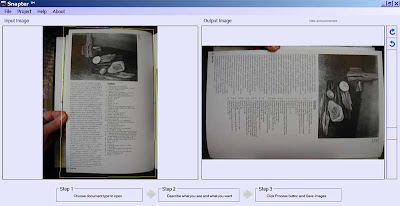 Another try using the Document setting. The finger on the side didn't cause any real problem, but again the result wasn't much different than cropping with a regular image editor.
Figure 8.
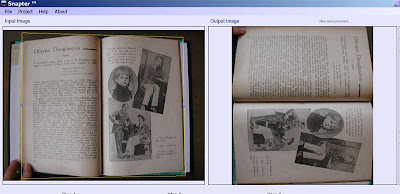 I decided to try doing a two-page spread on the Document rather than Book setting. Actually, I did this because I couldn't get Snapter to start a new project (ie with different settings) without closing the program, so why not experiment? But as one might expect, the results were pretty much just a closer crop and the strange rotation. (Note: the reason I couldn't get it to start a new project seems to have been that I was dragging and dropping into Snapter. The program seems to want you to use a specific folder for the source images, namely the one they have examples in, but my photos were on my second hard drive and it was a real pain constantly choosing that directory.)
Figure 9.
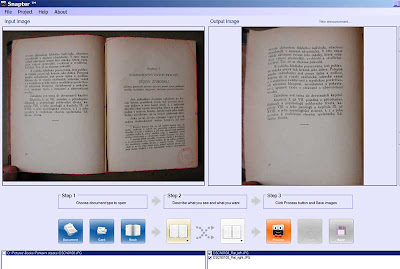
 So... I restarted Snapter and did the same spread using Book. This shows results for the left page--the finger doesn't cause much of a problem, but I couldn't correct the top border, so there's little curl adjustment.
Figure 10.
 And here's the result for the right page. It doesn't do very much, I think. A bit straighter but still curled.
Figure 11.
 Here, I was able to get pretty good results despite the finger in the lower left corner (the outlines are adjusted the best I could), but while I grant that the finger throws off the lower left corner, why should that affect how Snapter deals with the other page corners? And, while this result is not bad, I wouldn't say it's any improvement on the original. The same was pretty much true of the right-hand page... good but not remarkably better.
Figure 12.
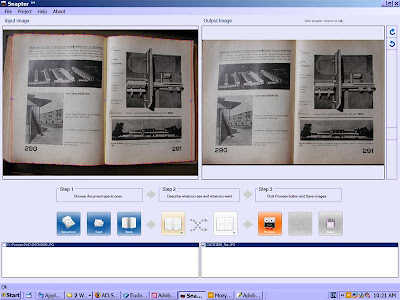 Here I got quite good results. Not perfect, but quite good. Had I been able to adjust the boundaries more, the results might have been better. My question with this one is, when the original is this good, and the adjusted version isn't perfect, why would I really bother? Some people would find this amount of adjustment satisfactory. For me, the original was quite readable and I would have wanted the adjusted version mainly so that I could have a nicer looking image for presentations.
I conclude that at this stage, Snapter may be useful for single-sheets or pages, and for books that are very carefully photographed to be well centered against a dark background, with nothing holding the pages in place. I question, however, whether a person really needs to do anything special to most photos that fall in that category. Generally I'd think you could crop and rotate them nicely with most image editors, with less fuss. Other users will have to decide whether their images benefit.
For photos of open books, I believe Snapter has wonderful potential but needs a lot of development in order to be able to handle normal real-life situations. Most books don't open very flat, so the photographer has to do something to make the text reasonably visible, like hold the volume open with one hand or with another book. It seems to me that if the user could adjust all the nodes fully, this would go far to eliminate bad results. Not being a programmer, I don't know how easy it would be to implement that.
Snapter claims that it will do bulk adjustments. I haven't tested this, because I have yet to try a photo that didn't need quite a bit of fiddling with (even those that could be made to produce decent results). Let's face it, even with Irfanview, which can do lots of relatively sophisticated batch edits on photos, I wouldn't be likely to do a batch edit that changed the picture quality, I only do batch edits that do things like change the file name or size or that put a copyright notice on the image (and I do these on copies, not originals, but Snapter does do everything to a copy, not on the original, so that's not an issue here).
I'd also like to see better documentation for Snapter. As far as I could tell, its documentation consists of some basic tips on their website regarding using a dark background and centering the object. I didn't find its supposedly intuitive interface that easy to deal with--it's too dumbed down. Also, it relies a lot on right-clicking, but nothing in the regular menus alerts the user to this. I've used a lot of different programs over the past twenty years but still find Snapter kind of clunky to use since it seems to expect me to read the developers' minds regarding what its different features do or how to accomplish basic tasks. I mean, come on, if I don't understand something in Photoshop, at least I can look it up.
So... that's about all I intend to say about Snapter until the software is further developed, which I very much hope it will be!
Note: A new version of Snapter has come out (July 2007).
First, let me clarify what I do, why, and how I do it.
Many books I need in my research are relatively hard to find; they also tend to be long and/or include images I want to study. In the US, I ordered some of these via Interlibrary Loan, and while ILL is a heavenly service, the laws of nature apparently dictate that anything ordered on ILL will arrive when one has the least possible time to peruse it. Consequently, I scanned a few of the shorter and less fragile titles, and used our departmental camera stand to photograph others. I also photographed some books from our own library, or that I had bought, so that I could have the material readily available on my laptop when I went to Prague.
In Prague, I photograph some books but particularly material from bound journals, most of which are from about 1920-1938. Some of these have very tight bindings, meaning the pages don't want to lie very flat, and some of them have fragile or damaged pages because they were printed on poor quality paper and have been heavily used over the years. I also photograph archival documents.
My next step, usually, is to create a PDF document of the book or journal. This is in order to have one file rather than hundreds, and so that (theoretically) I can set it up for highlighting and other markup. I use Acrobat 6, and the process is 1) Create PDF from multiple files; 2) do any rotations necessary; 3) if the text is fairly straight and in a western European language (i.e. not Czech or Polish), I run the Capture feature. Acrobat's Capture feature is a type of OCR and makes the document searchable and highlightable, but unfortunately version 6 doesn't have support for Czech documents, so I can't do this on most of my texts. Also, which is relevant to Snapter, the Capture feature fails on documents where the lines of text aren't straight enough. (Capture also requires a minimum 300 dpi image, more for small text.)
I perceived, then, a need for something that could correct problems relating to page curvature. After all, if something is merely crooked, I can rotate it in Photoshop, but I'm not aware of any curvature correction in Photoshop (I'm not an advanced user so it might be there, but probably not the kind I seek; correct me if I'm wrong).
Well, I'm sorry to say that my initial experiments with Snapter were disappointing. This shouldn't prevent anyone from trying it, as it's a new product, still being actively tested and improved (barely out of beta), a free trial, and other people's results may be very different than mine. So, go ahead and download it and test it yourself!
I thought, however, that I would show some screen shots of my testing results. They go from the abysmal to the usable.
Figure 1.
 Using your fingers near the spine to hold the pages flat (something I frequently have to do) causes Snapter total meltdown. Click on photo to view exactly where the bounding lines go on this otherwise pretty straightforward photo. Yeah, they're all up above the book.
Figure 2.
 Here, the fingers are farther apart so Snapter at least recognizes that it has to do something. Putting lines around the book, however, are not yet on its agenda.
Figure 3.
 One of my main gripes about the version I used (1.03.04) is that I didn't find it very adjustable. OK, so the program initially didn't quite recognize the page borders, but it should be possible to manually adjust. Note the placement and length of the yellow line. It's supposed to be the divider between the two pages. I found that it was somewhat possible to move it right or left if Snapter misplaced it, but for some reason it usually was very short and I couldn't get it to lengthen to the full height of the book. That then messed up the red lines that are supposed to delineate the edges of the pages. Note how on this pretty much nice-and-flat volume the red lines go all over. If this bound journal were any flatter, I wouldn't even bother to try correcting it. As far as I can tell, the problem here must be that the page goes to the edge of the photo at one point, as Snapter requires a dark background all around. Well, when I took the photos, I was trying to maximize page coverage, and avoiding having background. I had no idea I would later need a dark background for Snapter.
Figure 4.

In this example, Snapter messes up the outline for the left page, which I think (I did these a couple of weeks ago) resulted in it working on only the right page. (Click on the image to see a larger version that shows how the red line cuts off the left-hand page near the gutter.) It is possible to move the red lines a small amount, but what I found curious is that while they have various nodes that ought to be adjustable, I was only able to move two of the nodes--those that represent the centers of the page edges farthest from the spine. Even those could only be moved a small amount. This meant I couldn't correct for most of the problems presented in Snapter's initial attempt.
Figure 5.
 In this instance, the paper I had used to hold the left page in place messes with Snapter's need for a dark background. However, I really don't understand why that affected the rest of the image. You'd expect it to mess only with that edge.
Figure 6.
 Some of my photos are single-page, so I did some tests using the Document setting rather than Book. Here, it cropped ok (but so would any image-editing program), but since I could only choose the corners for adjustment rather than additional nodes (still an improvement over the adjustability for the Book setting), the result didn't flatten much. In other words, I could have gotten the same result in quite a few other programs and not had it mysteriously rotate.
Figure 7.
 Another try using the Document setting. The finger on the side didn't cause any real problem, but again the result wasn't much different than cropping with a regular image editor.
Figure 8.
 I decided to try doing a two-page spread on the Document rather than Book setting. Actually, I did this because I couldn't get Snapter to start a new project (ie with different settings) without closing the program, so why not experiment? But as one might expect, the results were pretty much just a closer crop and the strange rotation. (Note: the reason I couldn't get it to start a new project seems to have been that I was dragging and dropping into Snapter. The program seems to want you to use a specific folder for the source images, namely the one they have examples in, but my photos were on my second hard drive and it was a real pain constantly choosing that directory.)
Figure 9.
 So... I restarted Snapter and did the same spread using Book. This shows results for the left page--the finger doesn't cause much of a problem, but I couldn't correct the top border, so there's little curl adjustment.
Figure 10.
 And here's the result for the right page. It doesn't do very much, I think. A bit straighter but still curled.
Figure 11.
 Here, I was able to get pretty good results despite the finger in the lower left corner (the outlines are adjusted the best I could), but while I grant that the finger throws off the lower left corner, why should that affect how Snapter deals with the other page corners? And, while this result is not bad, I wouldn't say it's any improvement on the original. The same was pretty much true of the right-hand page... good but not remarkably better.
Figure 12.
 Here I got quite good results. Not perfect, but quite good. Had I been able to adjust the boundaries more, the results might have been better. My question with this one is, when the original is this good, and the adjusted version isn't perfect, why would I really bother? Some people would find this amount of adjustment satisfactory. For me, the original was quite readable and I would have wanted the adjusted version mainly so that I could have a nicer looking image for presentations.
I conclude that at this stage, Snapter may be useful for single-sheets or pages, and for books that are very carefully photographed to be well centered against a dark background, with nothing holding the pages in place. I question, however, whether a person really needs to do anything special to most photos that fall in that category. Generally I'd think you could crop and rotate them nicely with most image editors, with less fuss. Other users will have to decide whether their images benefit.
For photos of open books, I believe Snapter has wonderful potential but needs a lot of development in order to be able to handle normal real-life situations. Most books don't open very flat, so the photographer has to do something to make the text reasonably visible, like hold the volume open with one hand or with another book. It seems to me that if the user could adjust all the nodes fully, this would go far to eliminate bad results. Not being a programmer, I don't know how easy it would be to implement that.
Snapter claims that it will do bulk adjustments. I haven't tested this, because I have yet to try a photo that didn't need quite a bit of fiddling with (even those that could be made to produce decent results). Let's face it, even with Irfanview, which can do lots of relatively sophisticated batch edits on photos, I wouldn't be likely to do a batch edit that changed the picture quality, I only do batch edits that do things like change the file name or size or that put a copyright notice on the image (and I do these on copies, not originals, but Snapter does do everything to a copy, not on the original, so that's not an issue here).
I'd also like to see better documentation for Snapter. As far as I could tell, its documentation consists of some basic tips on their website regarding using a dark background and centering the object. I didn't find its supposedly intuitive interface that easy to deal with--it's too dumbed down. Also, it relies a lot on right-clicking, but nothing in the regular menus alerts the user to this. I've used a lot of different programs over the past twenty years but still find Snapter kind of clunky to use since it seems to expect me to read the developers' minds regarding what its different features do or how to accomplish basic tasks. I mean, come on, if I don't understand something in Photoshop, at least I can look it up.
So... that's about all I intend to say about Snapter until the software is further developed, which I very much hope it will be!
Note: A new version of Snapter has come out (July 2007).
posted by Karla at 11:50 AM
![]()
![]()

8 Comments:
Holy cow, what the heck are you reading! Deform tools are always pain, regardless of the program. Unfortunately, the best solution is usually to start with a better original. Barring that, Paint Shop Pro has a "deform" and "perspective correction" tools that are sort of not annoying.
Photoshop has great tools too, but I swear that everything is just a little more time consuming in Photoshop.
IrfanView is the best program ever, for what it does. Just a great simple graphics editor. You can also use it to floss your teeth!
Hi Karla. Here we are two years later. Just stumbled on your blog after being mystified by Snapster 2r4. Here for your amusement is what I submitted to Snapster support:
--------------
Hi folks:
I like the idea of what snapter is supposed to do, but having downloaded it I find it's completely inscrutable. And I'm a software developer with 35 years experience.
When it starts, the most prominent thing is an instruction in the Input Images box to drag and drop images onto the Project Icons. What images, and what are Project Icons? I tried dropping images from Explorer into Input Images box but no dice. Since I don't know what Project Icons are, I'm stuck. OK, maybe I'm supposed to start a project using File > New Project > Book. Tried that... it wants to open a file, but doesn't say what kind. Is it asking for a name for the Project? Does it want an image? Eventually I dropped a jpg onto the Book button. That at least appeared in the Input window. Now what? Some of the buttons appear to be actual drop down menus, what do those do... am I supposed to select something? There's a mysterious looking series of dots at the top of the input image which when dragged make some kind of graph. I try pressing the process button. The application either produces a completely black rectangle, or hangs, or crashes and says to contact support.
Bottom line, this thing REALLY REALLY needs some documentation, or help or something, explaining what moves are available, what's supposed to happen at each stage and so on. And no, the Help > Online Support > Getting Started doesn't do it, because it doesn't even describe the software. Even google can't find any mention of Project Icons at snapter.atiz.com.
Truly mystifying why such a lot of effort has gone into something so utterly unusable. Let me know if there are some explanations out there somewhere.
---------------
I'm simultaneously amused by your report and, of course, appalled that Snapter hasn't become any more usable in two years. I really had high hopes that this software would become something worthwhile.
On the snapter web site is a "how to use" link in the middle of the page.
It will show you what the "project icons" are quite readily.
In that "how to use" section there are also some simple images/captions showing proper and improper use and capability of the software.
It pretty clearly states that you cannot have fingers along the top or bottom edge of the book, but it is OK to have them on the sides.
I have not used this software, or even gone through the 'how to use' section as mentioned for more than 30 seconds or so.
I just wanted to point out for other people looking for reviews of this software that there may be more to the story than just the negative comments here.
- Mike
Having experimented with the software now for about an hour or more I'll say this much.
It is crap... to a degree.
It is essentially some image correcting algorithms and not much more. The usability is horrible.
That said... it does do what it says if you can meet the requirements.
First.. I'm using vista and could not get the drag-drop to work at first.
It asks you to do first run as admin. If you are set up in the accepted proper way of a separate admin account from your normal usage account then this seems to flummox the operation.
I ran snapter itself as admin from within my normal user account. This would not allow the drag and drop to work at all.
I shut it down and ran it a second time normally and drag/drop worked.
It is normal to expect that when telling it to start a new project, as mentioned above, that you would input a project name and it would set up space.
That is not what it's doing.
You start a new project and point at jpg files to act as input.
You can do this with the open dialog for new projects through menus, or with drag/drop, or by clicking on the project icons.
Once the images are input, you can right click on the input and output list of images separately to remove particular images or tell the software to only act on particular images by 'checking' them or not (this is only a right-click operation if selecting 'all').
That and a bit of fumbling gets you through.
There is a drop down in the menu system to save as pdf.
You must adhere to its requirement of solid color backgrounds, etc.. for it to do a decent job.
I imagine if you took the time to set up a little photo stand to use it then it might work well.
For my little digicam, I did not get the image resolution I wanted when pulled back far enough to get the entire open book in frame as required by the software.
You also need even lighting as shadows will throw it off.
- Mike
Thanks, Mike. I haven't had time to investigate updates to Snapter, so I appreciate all these new comments as quite a few people do look at this page.
Just to make my perspective clear, I have no affiliation with any software company and no particular ax to grind, I'd just like to find software that would perform corrections on the thousands of photos I took before Snapter came on the market (thus before I could try to adhere to their very specific requirements). Some of my photos were taken on a camera stand with special lights, most of them in the library with natural light and no special equipment.
You need a black backgrond! Then snapter ist working very vell! I use it for my studis.
Thank you, Anonymous, but if a person's existing photos don't have a black background, well, that's not much help.
Post a Comment
<< Home